
|
|
|
| A Little Background On The Need For A Hackintosh: | |
| We have had a number of people come to us for Apple MacBook
repairs. Because we are not primarily a Mac shop and did not want to invest
in the pricey Apple hardware, we did a little research and discovered that
the new Macs are using Intel processors.
We also discovered some neat software by the name of MacDrive 8 that allows a PC to read and write Mac disks, CDs and DVDs. Don't need to fire up OS X just to check out a drive or backup data from a drive that is going bad. The next logical step was to see if we could get OS X to run on one of our PC systems. First we purchased a retail version of OS X 10.5.4 to see what it would do right out of the box. It did not do anything because our PC system could not find a boot block on the DVD. Our next starting point was a web site called http://wiki.osx86project.org/wiki/index.php/Main_Page This site contains a wealth of information and links for anyone wanting to build a Hackintosh. We did find however, that there are no clear cut step by step instructions that work for everybody. The main reason is differing hardware and a misunderstanding of how the process actually works.
|
|
| Our Hardware Platform: | |
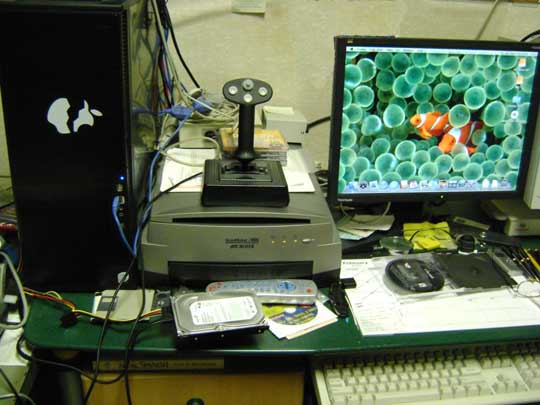
| Our base platform for the Hackintosh uses an Intel D975XBX2
motherboard with the latest BIOS and Driver updates. It is populated with
an Intel X6800 Extreme processor over-clocked to 3.34ghz. The Front Side
Bus is over-clocked to 1116. The PCI bus is over-clocked to 36 and the
PCI Express bus is over-clocked to 109.
We are using 6 USB ports for a combination of modems,
a Smart UPS, a Joystick, two hi-def video cameras and a MIDI system. There
is also a 1394 flatbed scanner attached and a voice modem on a serial port.
|
|
| The reason I am putting this information here is to show
you that we are not running a low end straight vanilla PC. This system
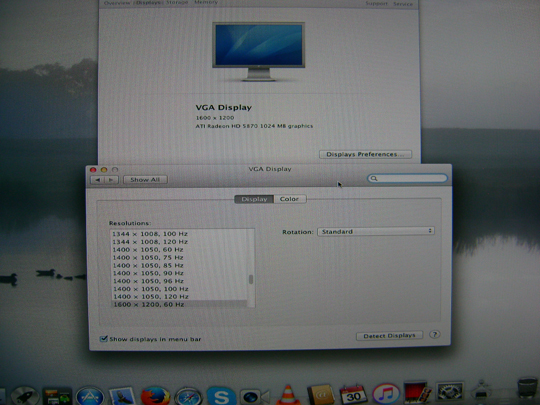
has 3GB of 800mhz memory, it has a ATI Radeon HD 5870 1024MB video card,
it has an Adaptec 29320A Ultra 320 SCSI disk controller with disks and
a tape drive attached and a SoundBlaster X-Fi Extreme Music sound card.
We are also using the Primary onboard IDE controller for CD-RW and DVD-RW drives, there are four SATA II hard disks on the primary SATA controller, one of which OS X is installed on. There are three SATA II drives on the secondary SATA controller.
|
|
| Software We Used: | |
| You can find all of the listed software on the internet
by doing a search for the names listed below: Please note that the Kalyway
downloads are in excess of 7 GB. If you do not have one already, you will
have to download and install one of the Torrent Clients to access these
downloads. We used uTorrent from Bit Torrent Inc. which can also be found
on the web.
Boot-132 - There are many flavors of this software,
we used BOOT-DFE-146-BUM
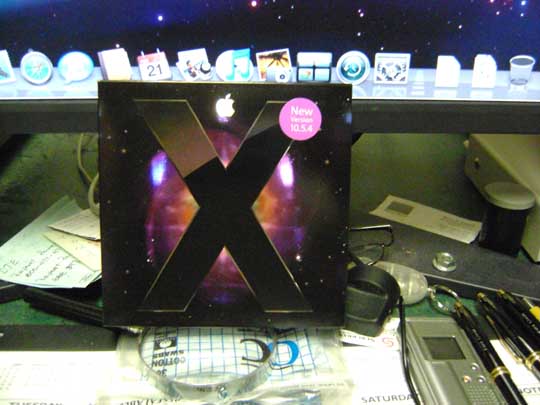
iATKOS S3 Version 2 - OS X 10.6.3 upgrade (Section
15)
Chimera Boot Loader v2.2.1
Note that as of 03-2016 all of the Apple updates are still available at https://support.apple.com/downloads/ On our backup Pentium 4 3.2ghz system it took over 4 hours for the Kalyway OS X 10.5.2 and OS X 10.5.3 downloads. The downloads from Apple took only a couple of minutes. Note that we used Nero to do all of the CD and DVD burning.
|
|
| The Step By Step Process: | |
| 1 - Download Boot-132
After you download this file you will need to burn it to a CD as an ISO image file. If you are not sure what an ISO file is you will need to consult your CD-DVD burner software help files. 2 - Download Kalyway OS X 10.5.2
3 - Download Kalyway OS
X 10.5.3 combined Update
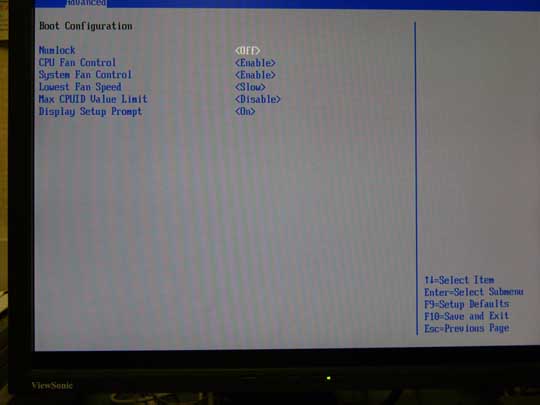
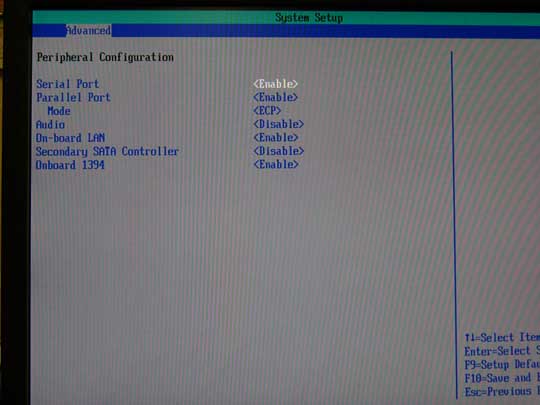
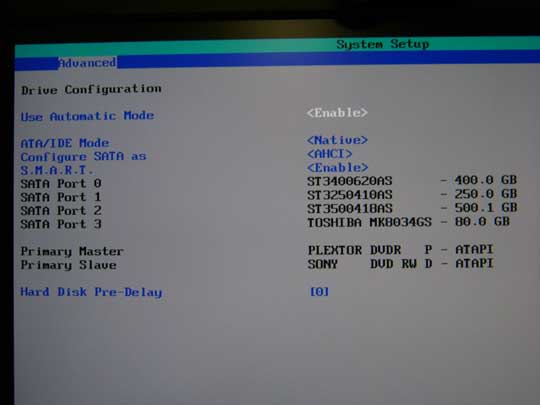
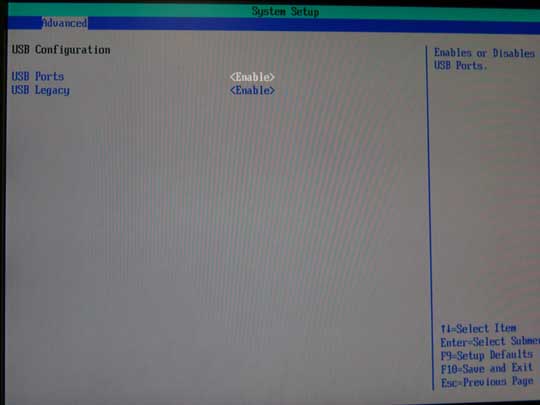
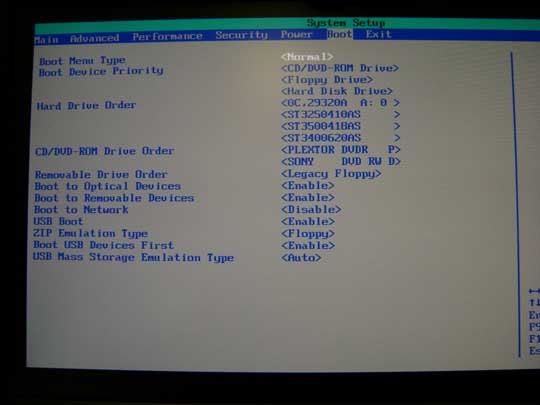
4 - Hackintosh System BIOS Settings
Here we do have AHCI enabled for drive 'Hot Swap' support.
NOTE: The drive on which you are
going to install OS X must be on the Primary SATA controller which are
the black SATA ports 0 to 3. If you connect your OS X drive to the secondary
SATA controller (blue or red ports) it will not boot and you will get constant
"waiting for root device" errors.
The hard drive order does not make any difference to OS X because you must tell it which drive to boot from during the boot-strap sequence. In this list it is the second drive. Windows would not boot if we set the 29320A SCSI controller to anything other than the first thing in the list.
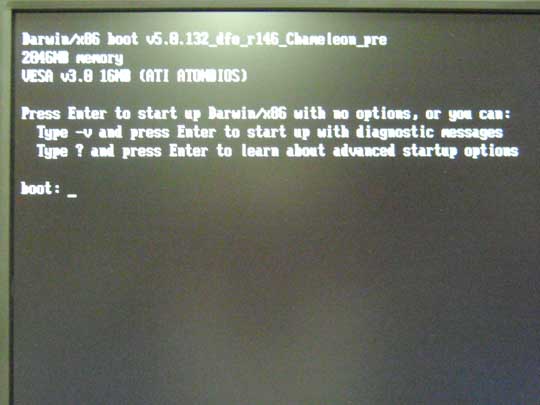
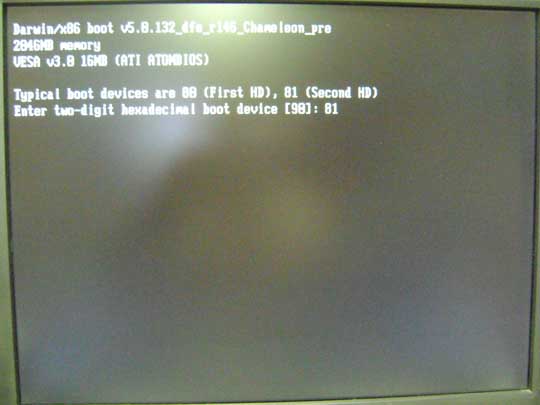
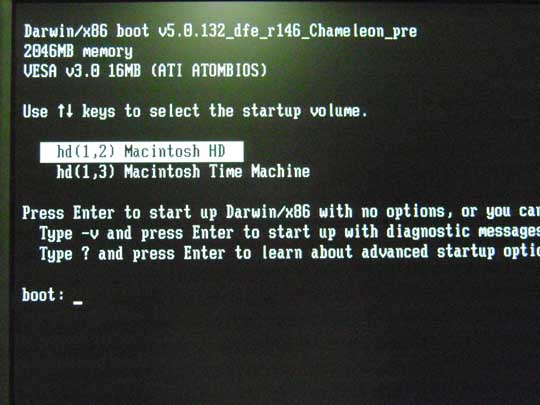
5 - Initial Boot
Restart your system. If you burned a good boot CD you should see the Darwin system bootstrap. At the BOOT prompt, remove the BOOT-132 CD and insert the Kalyway OS X 10.5.2 Installation DVD.
Wait until the drive access light goes out and then
press the Enter key.
Notice that there is a number in brackets after
the 'boot device', ours was [90]. This is the primary boot CD-DVD drive.
Sometimes the system would start installing after we hit
the Enter Key. Other times we had to hit the Enter key again and then got
the message "booting from default devuce". We may not have waited for the
activity light to go out.
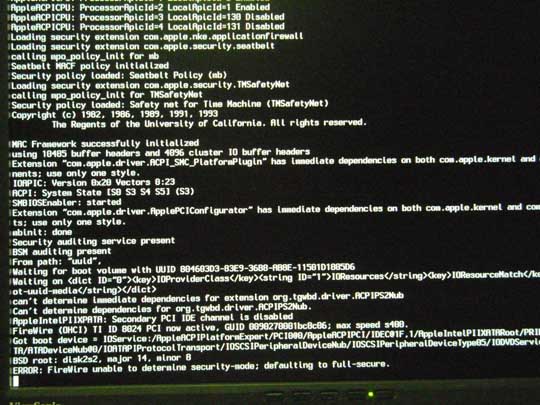
Press the Enter key and the system should start reading the DVD and posting a log to the screen.
Patience, this may take a while.
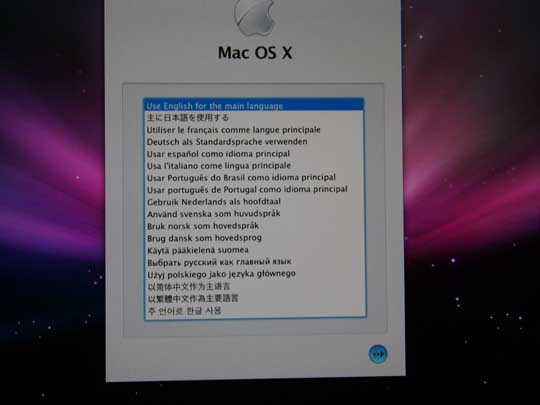
The next thing you should see is a screen asking you to select the system language, click on your choice.
Then click on the Arrow Buttom at
the bottom right side.
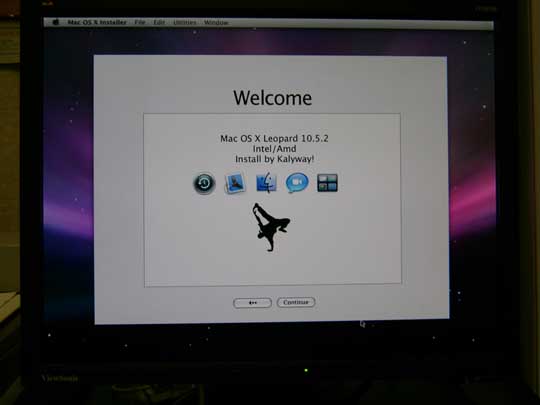
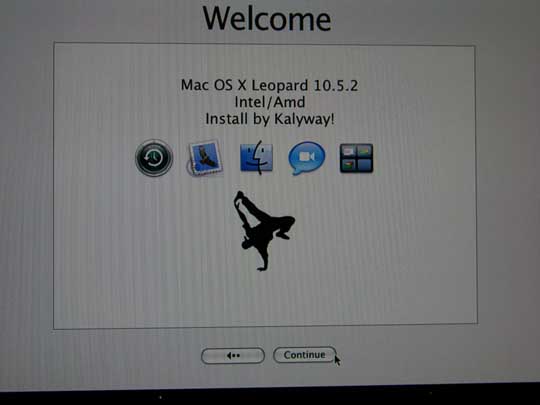
Finally the installation startup screen.
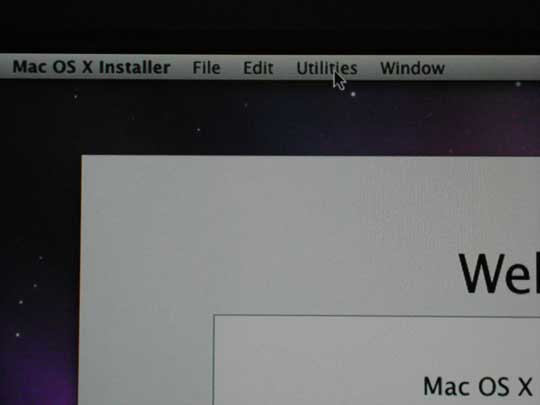
STOP - Do NOT click on Continue!
6 - Create a OS X 10.5.2 Partition
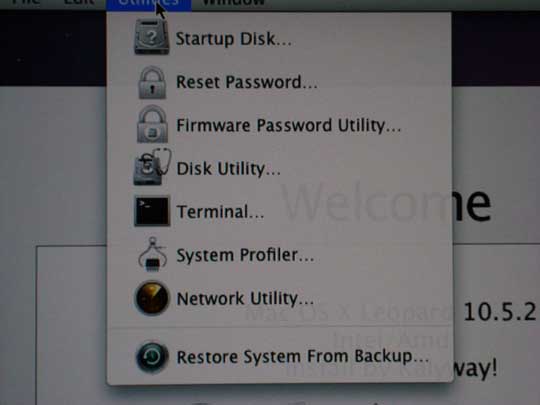
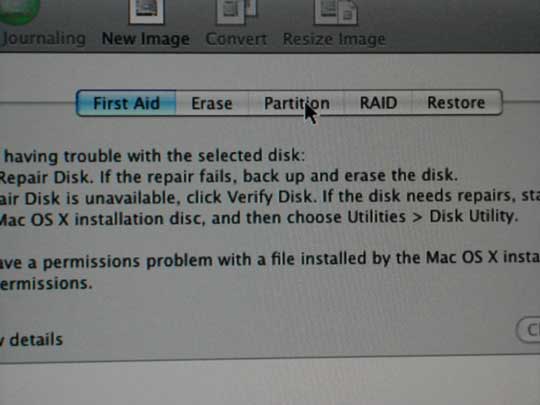
Select Utilities.
Clicking on the Utilities menu presents you with this menu.
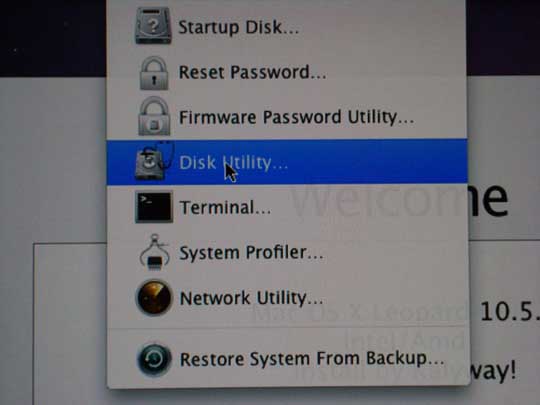
Select and click on Disk Utility...
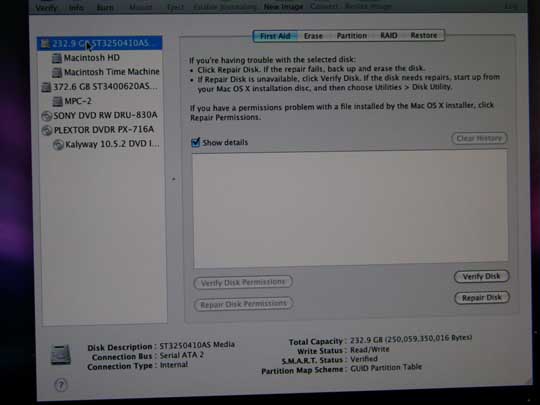
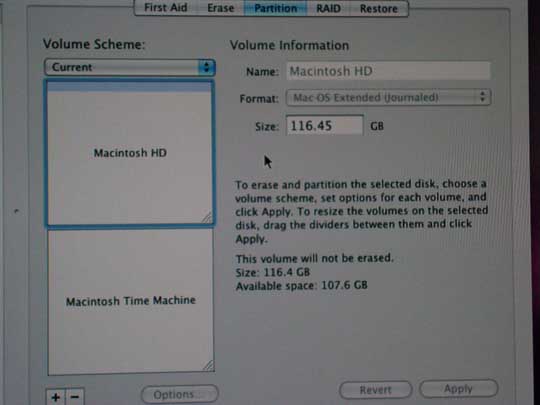
On the left side highlight the disk drive that you are going to install OS X 10.5.2 on. (we took these pictures after the fact that is why our drive shows it is already partitioned and named)
On the right side select Partition
Select the number of partitions you want and confirm that you want to complete the partitioning of the drive. (again these pictures were taken after the fact)
Click on APPLY and Exit out of the Disk Utilities (either
click on the red X or click on Disk Utilities on the menu bar and select
Quit Disk Utilities)
Now you can click on Continue.
7 - OS X 10.5.2 Installation
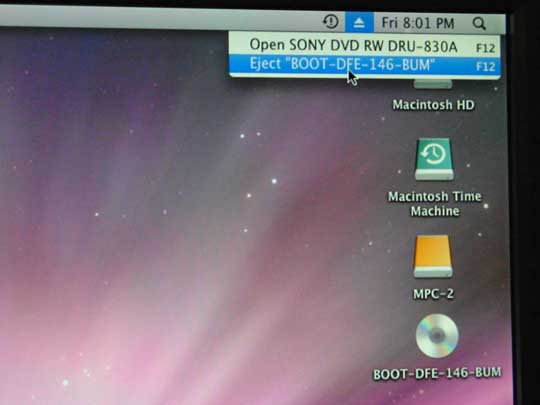
The tricky part here is that you may not be able to eject
the DVD that is in the drive.
Press the eject button on your DVD drive and remove the
Kalyway 10.5.2 DVD
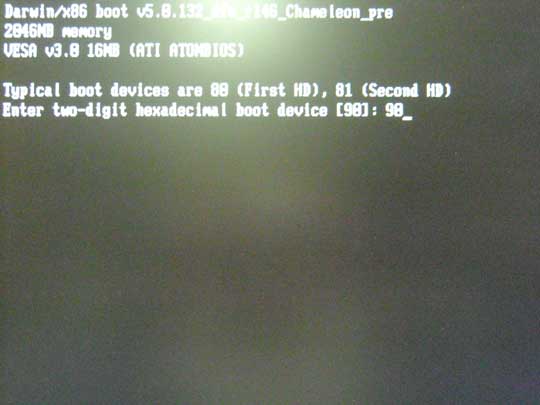
8 - OS X 10.5.2 Startup and Configuration
This time you need to enter the ID of the hard drive which will be 80, 81, 82 etc for the 1st, 2nd, 3rd hard drive. If you only have one drive the number should be 80, enter it and press the Enter key.
You should see a screen with a highlighted box with the name of the partition you created and installed OS X 10.5.2 in.
Press the Enter key.
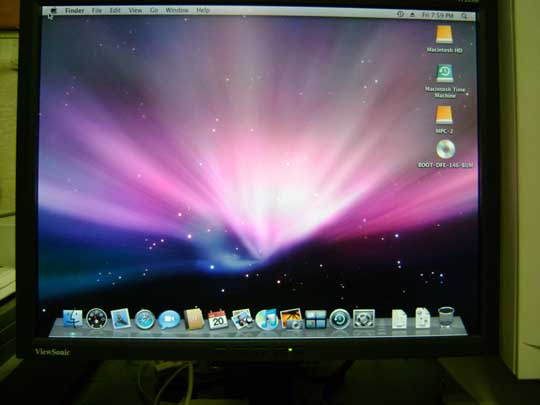
After the welcome message you should see the OS X 10.5.2 desktop.
Don't stop to celebrate just yet.
9 - OS X 10.5.3 Update
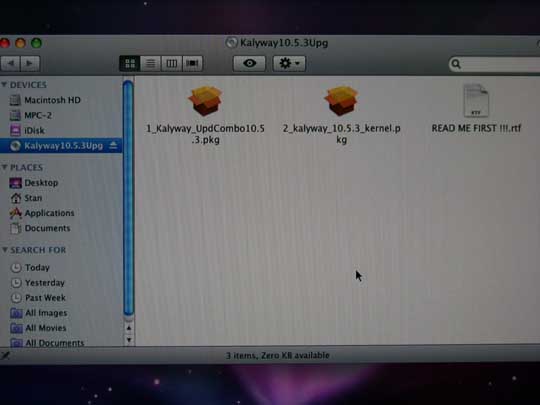
Insert the Kalyway OS X 10.5.3 Combo Upgrade CD into the
Primary Boot CD-DVD drive.
Click on the Drive Icon to open it.
You should see three folders.
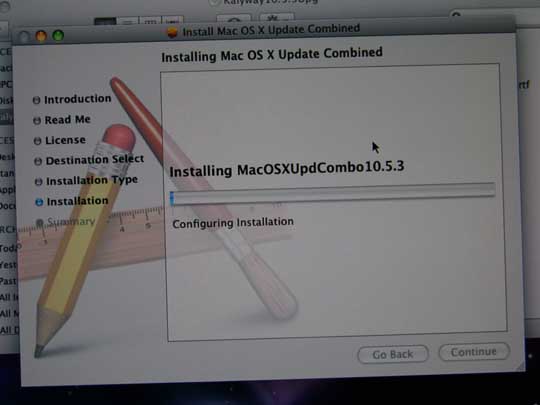
Click on the Kalyway_UpdCombo10.5.3.pkg
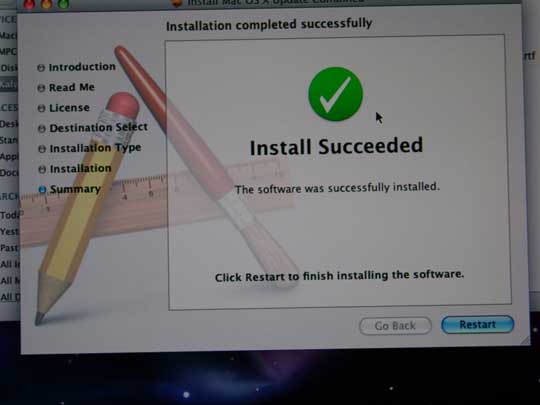
The OS X 10.5.3 installer should start and guide you through the install.
VERY IMPORTANT - DO NOT CLICK ON 'RESTART' WHEN IT FINISHES!
Go back to the window with the three folders.
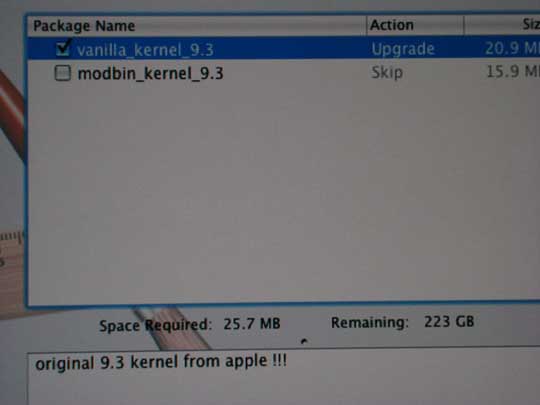
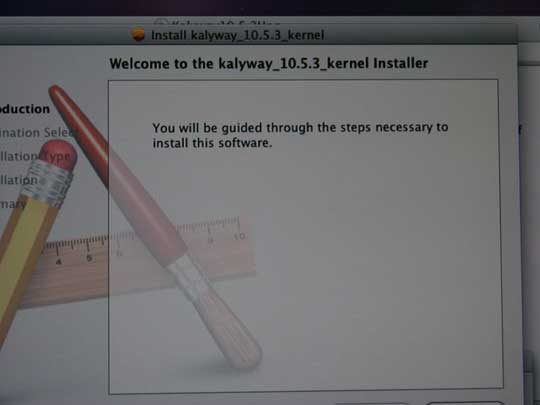
Click on the Kalyway_10.5.3_Kernel.pkg
You should see two folders.
Click on the Vanilla Kennel 9.3
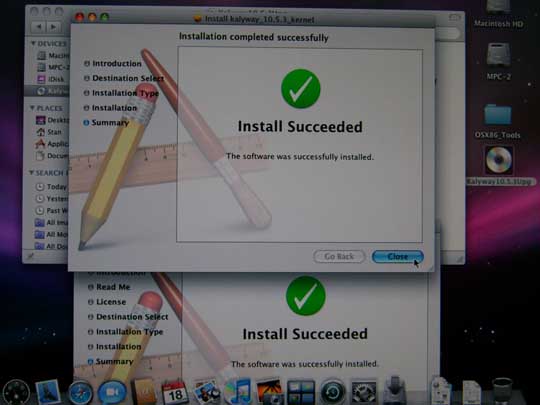
The Installer should start and guide you through the install.
When the Installer finishes, click on CLOSE in that window.
You are going to have to do the same CD shuffle you did
in the step 7.
Insert the BOOT-132 CD.
NOW CLICK ON THE 'RESTART' BUTTON IN THE Kalyway 10.5.3 Combo.pkg WINDOW.
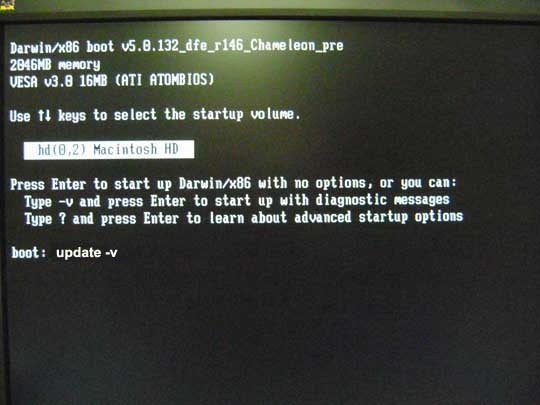
10 - Applying the OS X 10.5.3 upgrade Note that while you installed the OS X 10.5.3 upgrade in the step above it has not been totally applied. When you see the BOOT prompt press the Enter key.
This time you need to enter the ID of the hard drive which will be 80, 81, 82 etc for the 1st, 2nd, 3rd hard drive. If you only have one drive the number should be 80, enter it and press the Enter key. You should see a screen with a highlighted box with the name of the partition you created and installed OS X 10.5.3 in. Very Important - At the BOOT prompt enter "update -v" without the quotes.
If this is not done your system will reboot to a blue
screen with a spinning beach ball and will just hang there. All is not
lost however. Just reboot and repeat the above step.
After you press the Enter key you will see a screen with a black background and a bunch of stuff zipping by. You will also see some error statements highlighted in yellow go by. Do not worry about these.
Although it looks like the system stopped posting stuff to the screen, WAIT. It may take 10-15 minutes but the system should automatically reboot. If it does not you can reboot the system again and all may be OK. When the system reboots and you see the BOOT prompt press
the Enter key.
This time you need to enter the ID of the hard drive which will be 80, 81, 82 etc for the 1st, 2nd, 3rd hard drive. If you only have one drive the number should be 80, enter it and press the Enter key. You should see a screen with a highlighted box with the name of the partition you created and installed OS X in. This time at the BOOT prompt just press the Enter key
and the system should start and display the OS X Desktop.
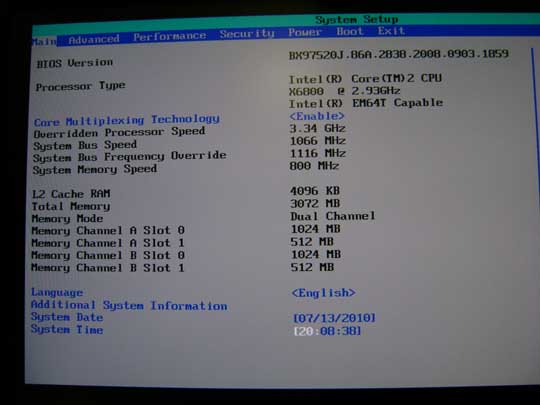
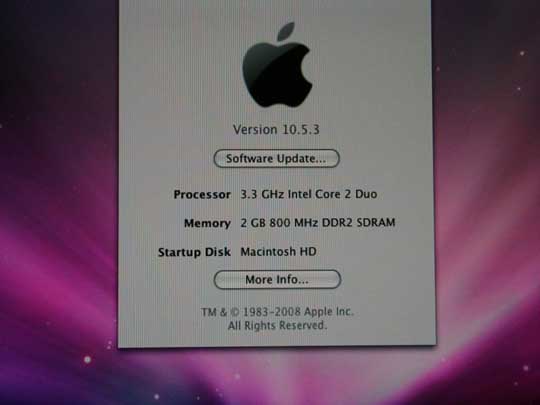
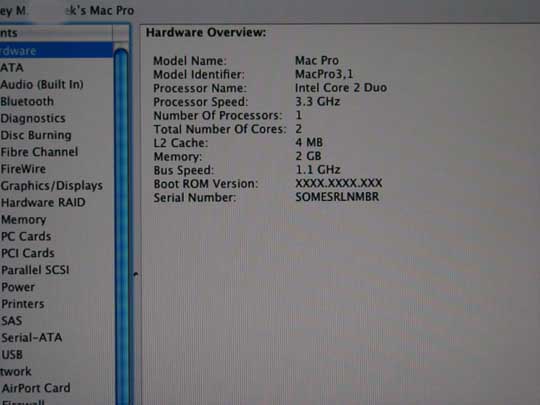
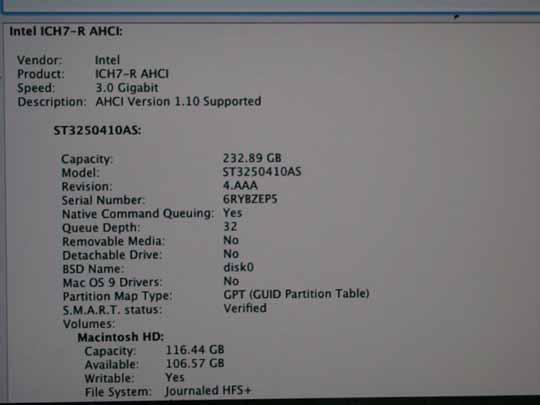
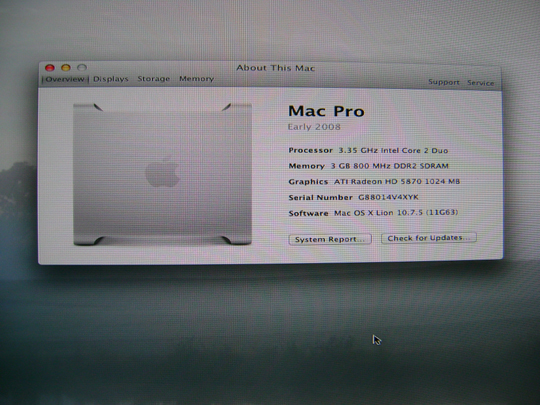
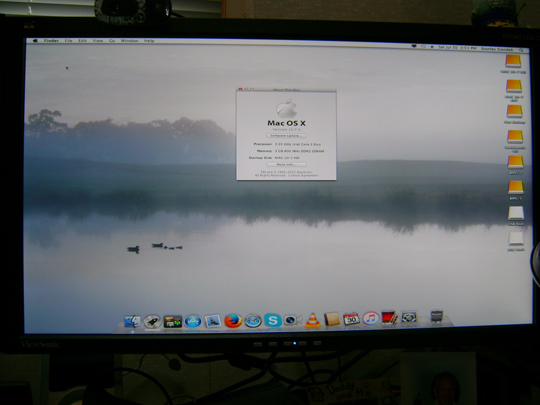
Checking the Hackintosh system information shows the following:
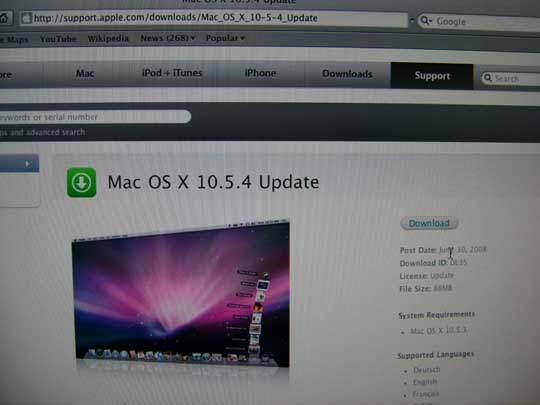
11 - OS X 10.5.4 Update We tried various ways to install the OS X 10.5.4 updates and found that the only way that worked for us was to connect to the Apple site, download and install the update. Just start Safari and enter the
address as shown below.
When you see the BOOT prompt press the Enter key.
This time you need to enter the ID of the hard drive which will be 80, 81, 82 etc for the 1st, 2nd, 3rd hard drive. If you only have one drive the number should be 80, enter it and press the Enter key. You should see a screen with a highlighted box with the
name of the partition you created and installed OS X 10.5.4 in.
VERY IMPORTANT - At the BOOT prompt enter "update -v" without the quotes.
If this is not done your Hackintosh will reboot to a blue screen with a spinning beach ball and just hang there. All is not lost however. Just reboot and repeat the above step. After you press the Enter key you will see a screen with a black background and a bunch of stuff zipping by. You will also see some error statements highlighted in yellow go by. Do not worry about these. When the system stops posting stuff to the screen, reboot the system again. When you see the BOOT prompt press the Enter key.
This time you need to enter the ID of the hard drive which will be 80, 81, 82 etc for the 1st, 2nd, 3rd hard drive. If you only have one drive the number should be 80, enter it and press the Enter key. You should see a screen with a highlighted box with the name of the partition you created and installed OS X 10.5.4 in. This time at the BOOT prompt just press the Enter key
and the system should display the OS X 10.5.4 Desktop.
12 - OS X 10.5.5 Update As with the OS X 10.5.4 update we tried various ways to install the OS X 10.5.5 updates and found that the only way that worked for us was to connect to the Apple site, download and install the update. Just start Safari and enter the
address as shown below.
When you see the BOOT prompt press the Enter key.
This time you need to enter the ID of the hard drive which will be 80, 81, 82 etc for the 1st, 2nd, 3rd hard drive. If you only have one drive the number should be 80, enter it and press the Enter key. You should see a screen with a highlighted box with the
name of the partition you created and installed OS X in.
VERY IMPORTANT - At the BOOT prompt enter "update -v" without the quotes.
If this is not done your Hackintosh will reboot to a blue screen with a spinning beach ball and just hang there. All is not lost however. Just reboot and repeat the above step. After you press the Enter key you will see a screen with a black background and a bunch of stuff zipping by. You will also see some error statements highlighted in yellow go by. Do not worry about these. When the system stops posting stuff to the screen, reboot the system again. When you see the BOOT prompt press the Enter key.
This time you need to enter the ID of the hard drive which will be 80, 81, 82 etc for the 1st, 2nd, 3rd hard drive. If you only have one drive the number should be 80, enter it and press the Enter key. You should see a screen with a highlighted box with the name of the partition you created and installed OS X 10.5.5 in. This time at the BOOT prompt just press the Enter key
and the system should display the OS X 10.5.5 Desktop.
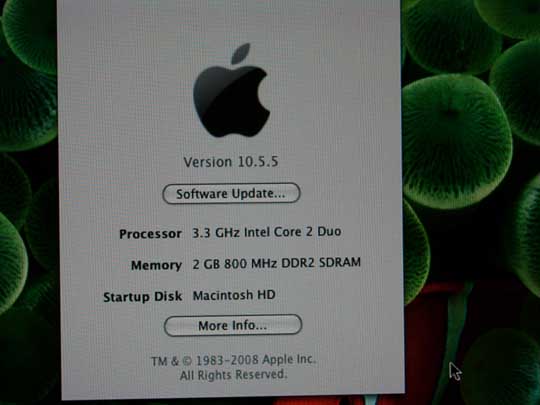
Checking the Hackintosh system information shows the following:
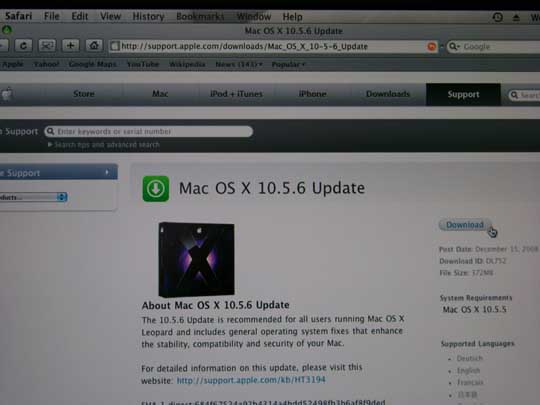
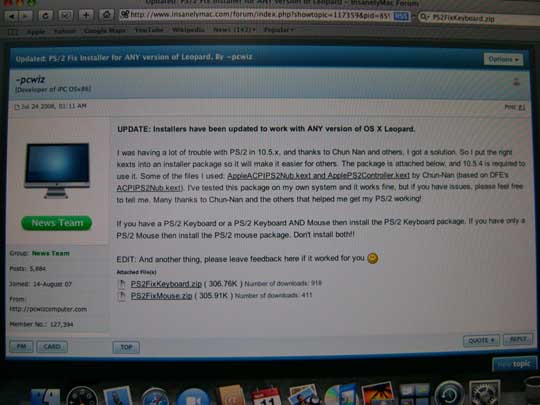
13 - OS X 10.5.6 Update Important Notice - If you are using a PS-2 Keyboard and / or a PS-2 Mouse, after you install the OS X 10.5.6 update they will not work until you apply a patch. You can only apply the patch AFTER you do the update. There is an easy fix if you have a spare USB KB and Mouse to use. See the Operational Notes section below. As with the OS X 10.5.5 update we tried various ways to install the OS X 10.5.6 updates and found that the only way that worked for us was to connect to the Apple site, download and install the update. Just start Safari and enter the
address as shown below.
When you see the BOOT prompt press the Enter key.
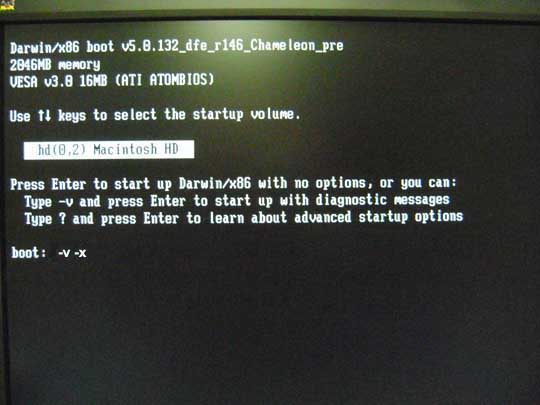
This time you need to enter the ID of the hard drive which will be 80, 81, 82 etc for the 1st, 2nd, 3rd hard drive. If you only have one drive the number should be 80, enter it and press the Enter key. You should see a screen with a highlighted box with the name of the partition you created and installed OS X 10.5.6 in. VERY IMPORTANT - This is different than before. At the BOOT prompt enter "-v -x" without the quotes.
This will boot the system into
Safe Mode. If you get to the login screen all is OK. Reboot the system.
When you see the BOOT prompt press the Enter key.
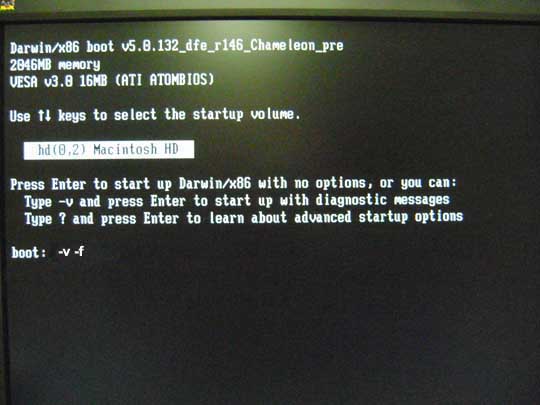
You should see a screen with a highlighted box with the name of the partition you created and installed OS X 10.5.6 in. VERY IMPORTANT - This is different than before. At the BOOT prompt enter "-v -f" without the quotes.
If all has gone well you should see the OS X 10.5.6 desktop. As noted above if you have a PS-2 KB or Mouse it will not work.
To fix the PS-2 KB and Mouse problem with OS X 10.5.6, plug in your spare or borrowed USB Keyboard and Mouse, then do a search on PS2FixKeyboard.zip. Install it and your problem should be solved.
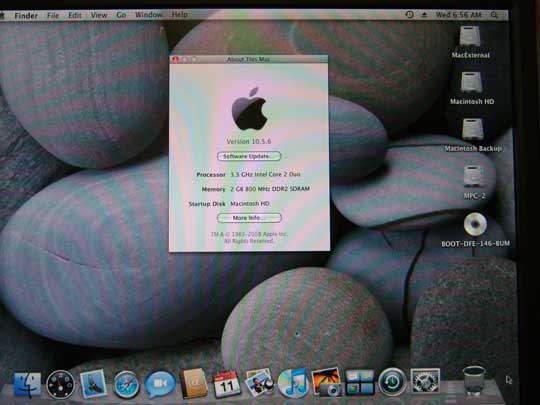
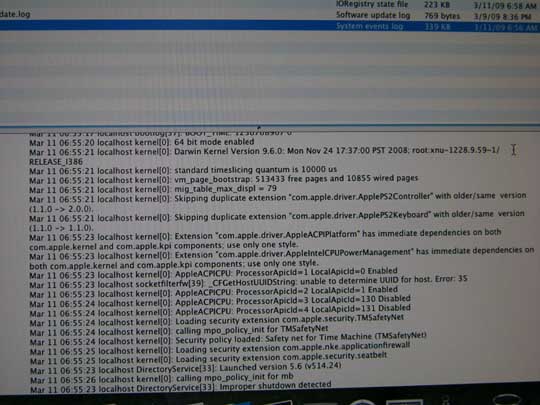
If you check the third line you will see that we are running the current vanilla Darwin 9.6 Kernel from Nov-24-2008
The Intel AHCI SATA controller is working.
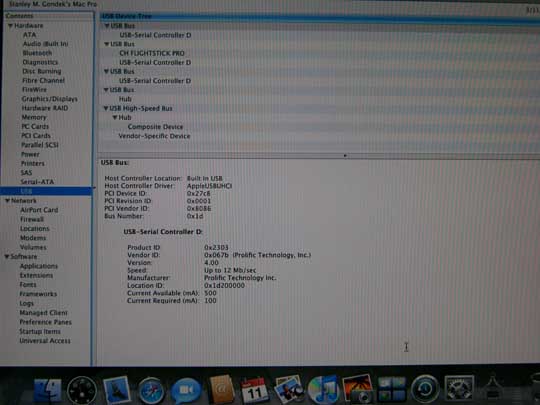
The USB Controller is working (even our joystick is recognized)
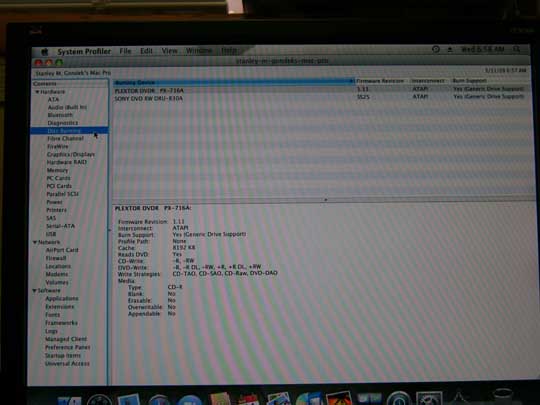
And our IDE CD - DVD drives are working with burn support.
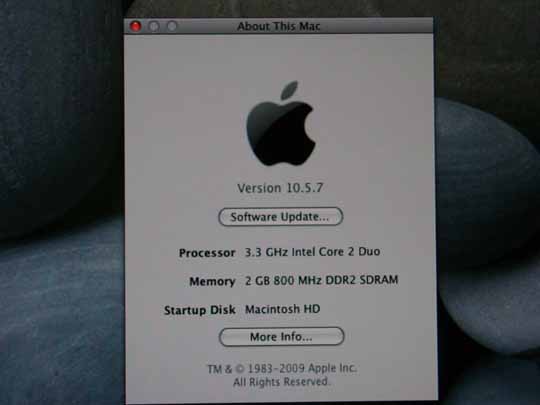
14 - OS X 10.5.7 and OS X 10.5.8 Update Just to see if it would work correctly we used the Software Update function in OS X to update our Hackintosh to version 10.5.7. and 10.5.8 All went well except for one glitch, our special Intel AHCI disk controller driver was overwritten and thus the default 'Generic' driver was used resulting in the incorrect disk icons being displayed on the desktop. We used the same fix that corrected the problem with version 10.5.3 and is explained in the Operational Notes section below.
After copying two .kext files from OS X 10.5.2 to OS X
10.5.7 our Intel AHCI disk controller works.
After copying two .kext files from OS X 10.5.2 to OS X
10.5.7 the correct drive icons are displayed.
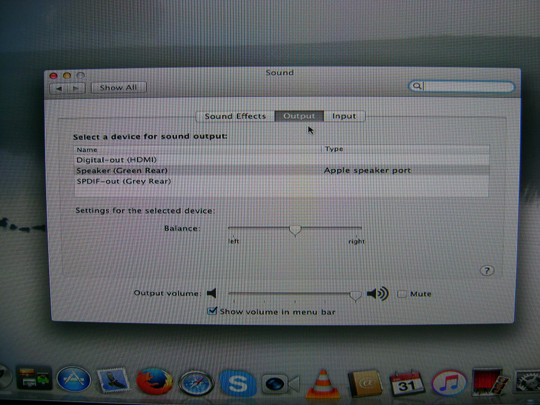
15 - OS X 10.6.3 and OS X 10.6.8 Ugrades We used the iATKOS S3 Version 2 - OS X 10.6.3 upgrade to upgrade from OS X 10.5.8 to OS X 10.6.3 and then let the system auto update to 10.6.8 using the Combined Update from the Apple web site. The main reason for the 10.6.8 upgrasde was so that we could run the latest versions of Safari and Firefox which are not supported in OS X 10.5. As a side benifit the AMD HD 5970 is supported natively
and works correctly without any Graphics patches. Also, the onboard sound
card works.
16 - OS X Application Software Updates The first time you run the Software Update application you will find that there are 8 to 10 application updates available. We did them one at a time and backed up in between. None of the application updates
caused any problems with our system.
17 - OS X 10.7.2 and OS X 10.7.5 Ugrades *** CAUTION *** Make a backup image of your system disk drive at this point because any problems will result in having to do the whole process all over again. Starting from step 1 including re-partitioning the drive. Don't ask me how I know..... It is best to spend a couple
bucks on a cheap Flash Drive and clone your current drive to it. Perform
all your update and/or clean installs to the flash drive rather than chance
wiping out your main system drive.
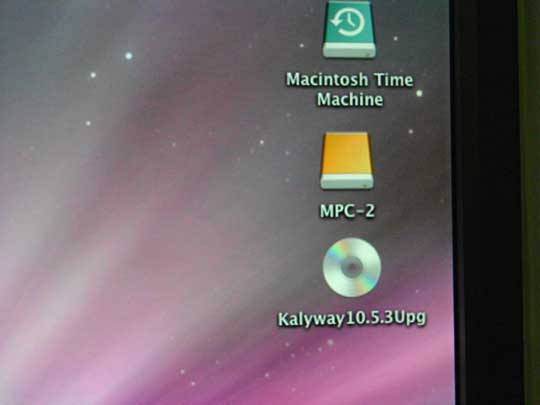
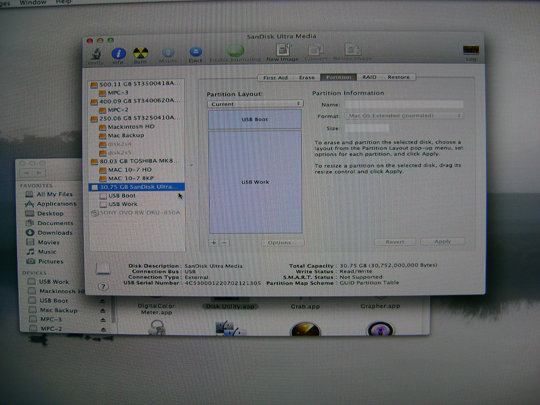
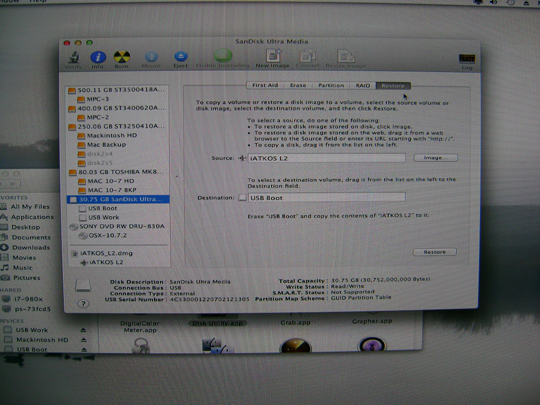
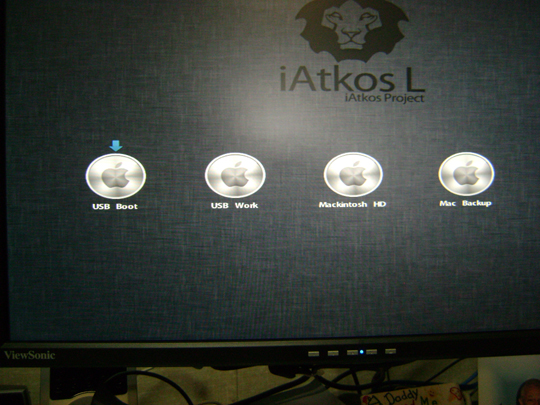
The main reason for the 10.7.5 upgrade was so that we could run the latest versions of the Apple Store and Facetime which are not supported in OS X 10.6.8. Other than that OS X 10.6.8 was working fine. We tried to use the iATKOS L2 - OS X 10.7.2 Lion upgrade to upgrade from OS X 10.6.8 to OS X 10.7.2 on our hard drive but kept getting installation errors no matter what we did. Because the installation errors were corrupting our hard disk we had to continously restore it so, we decided to use a 32GB USB flash drive to do the installation instead. After several more aborted upgrade attempts on the USB flash drive we decided to do a clean install of OS X 10.7.2 using the iATKOS L2 package just to see if that would work. Surprise! Surprise! It installed on the USB flash drive without a hitch. We started by using Disk Utility to partition the flash drive into two partitions, a 6GB partition (USB Boot) and a 24GB partition (USB Work). The 6GB partition would hold the iATKOS L2 installation image and the Chimera Boot Loader. The 24GB partition would hold the actual OS X 10.7.2 operating system.
Next the iATKOS L2 image file was mounted so it would be visible to the Disk Utility. To do this you need to have the iATKOS L2 DMG image file mounted by double clicking on it. Our's was burned to a DVD labeled OS X 10.7.2
After the image is mounted it needs to be restored to the USB Boot partition of the flash drive which may take 20 - 35 minutes depending on your system.
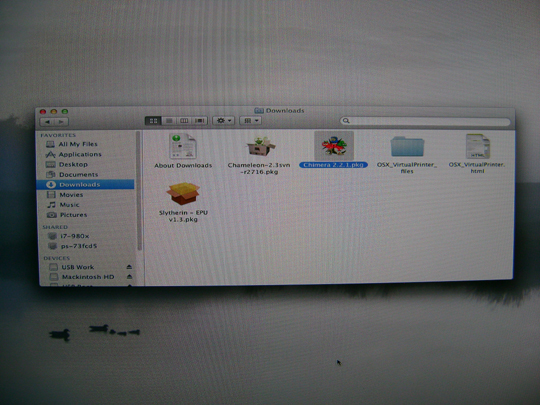
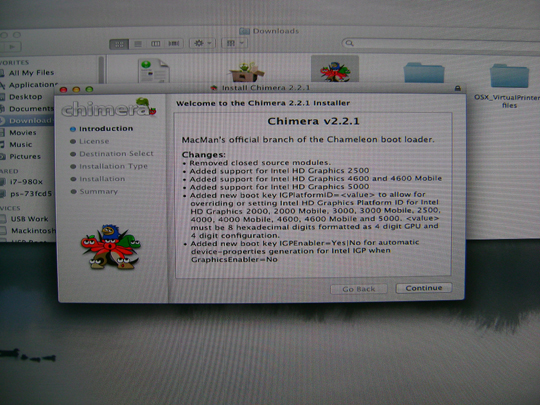
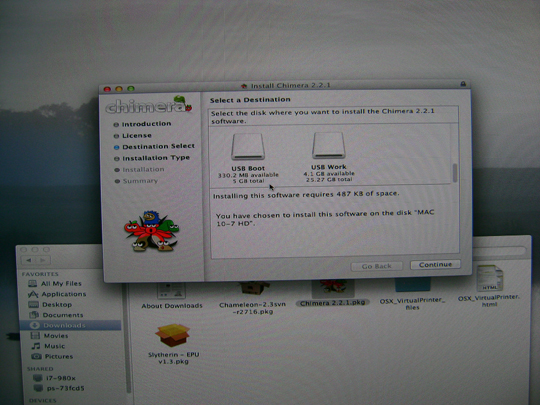
Next we opened and installed the Chimera.pkg file and installed the Chimera Boot Loader.
The Chimera Boot Loader was installed to the same partition, the USB Boot partition.
Now boot your system from the USB Flash Drive making sure that in your BIOS you have the option to Boot USB Devices First enabled.
The Chimera Boot Loader will present you with your USB Boot options, Select USB Boot and the normal OS X installer should begin. Make sure you change the installation location to USB Work. Once the installation has completed reboot and select the USB Work partition as the startup disk.
You may get a kernel panic on startup with the error 'ElliotForceLegacyRtc.Kext'. Go to the System\Library\Extentions folder on the USB Boot drive and rename that .kext to .Old. and reboot. Any other Kext errors just rename to .Old in case you want to use them later. After you have OS X up, running and stable you may want to delete the files you renamed .Old and run the Software Update to do a combined update to OS X 10.7.5.
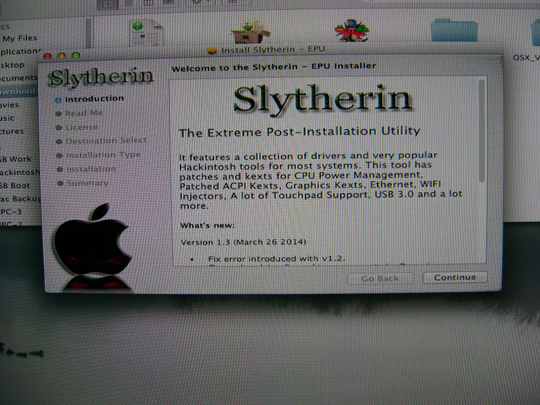
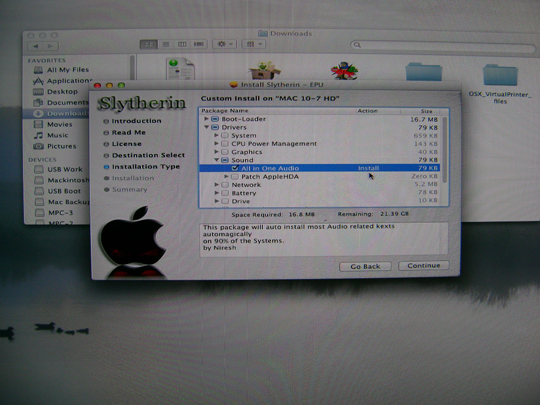
Once we updated to OS X 10.7.5 we noticed that the sound was not working correctly and after trying a number of suggested Kext changes we decided to use Slytherin.
We decided to use only the sound option so as not to introduce new problems.......
And it worked great!!
The HD 5970 is supported natively and works correctly without any Graphics patches.
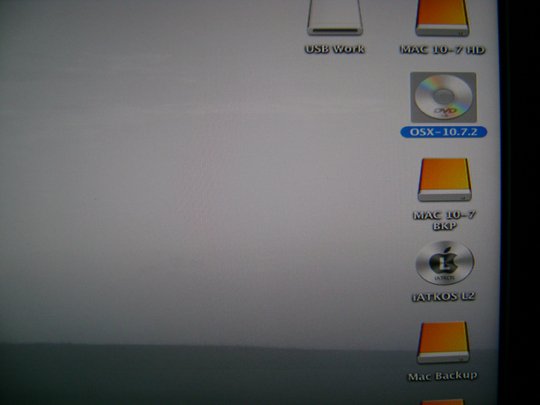
As you can see from the screen shot above, we have a number of disk drives connected to this system which have a number of different operating systems. Once we had OS X 10.7.5 running without any errors, we simply dragged most of our applications from the Applications folder on the drive with OS X 10.6.8 installed on it to the Applications folder on the drive with OS X 10.7.5 on it. Keep in mind that some applications have data in folders
other than the Applications folder and you will have to address each of
those folders individually.
|
|
| Operational Notes: | |
| We installed the OS X operating system on our D975XBX2
based PC to use as a educational and diagnostic tool. We have no intention
of using our Hackintosh for real life computing purposes because of a lack
of real world software. There may be problems that we are not aware of
when running other software on the system.
That being said, to make sure our hardware worked, we have loaded and successfully tested: Adobe PhotoShop Elements 3
You may have to continue to use the BOOT-132 CD to bootstrap your system and then enter your disk number to boot up OS X 10.5.8. There are ways around this using a program called OSX86Tools which can be found on the web. We found three glitches with
our Hackintosh:
The fix involves installing System\Library\Extensions\AppleAHCIport.kext
and IOACHIFamily.kext files from version OSX 10.5.2 into the current version.
This adds support for the Intel AHCI Raid Controller which the system once
again recognizes and restores the disk icons back to thier correct metal
finish for an internal drive. You can do this using OSX86Tools which can
be found on the web or you can manually copy the files to the correct directory.
Another glitch was that when we updated from version OS X 10.5.5 to version OS X 10.5.6 and then to 10.6.8 our PS-2 keyboard and mouse quit working. Seems that OS X 10.5.6 and up no longer supports PS-2 devices. Plugging in a USB mouse and keyboard temporarily solved the problem. The real fix is in a package named PS2FixKeyboard.zip. Again this fix does not work totally in OS X 10.6.8, it only fixes the keyboard. You will have to use a USB mouse until a fix can be found. The problem is that you need a running system to install
it, that is why we used a temporary USB keyboard and mouse. Once the installation
was done our PS-2 mouse and KB worked fine.
The last little grinch we have found is that the system clock gets set to whatever hour is relative in UTC time when booting back to Windows and must be reset in the BIOS before booting back up. For instance if the local time is 6:00 PM and UTC is 11:00 PM, when the system is booted the local time will be set to 11:00 PM. With that in mind please note that we made no effort to get the SoundBlaster X-Fi Extreme Music sound card working or the BlueTooth working. The on board sound card may in fact work, we just did not test it. Everything else seems to work correctly. MacDrive 8 has proven very handy when it came to doing file for file comparisons on our MAC drives. |
|
| We take no responsibility for any problems you may have, including but not limited to, loss of data or hardware failures that you may encounter using this information. It is presented here for educational purposes only. | |
|
(Click or Tap on the number to dial) Like Us? Rate Us! on Yahoo, Bing, Google, Yelp, Facebook, Whatever Last Updated 02-15-2022 If you have comments or suggestions, email us at supportgroup@m-p-c.com Copyright © 2009-2023 Multi Path Communications Van Buren Township, MI 48111 All rights reserved Computer Repairs - Upgrades - Custom Builds - Virus Removal - Software Backup, Installation & Upgrades |
|